Homemade Cronuts with Lemon Glaze
/
Last weekend Alex flew home to California for a bachelor weekend, which left me at home all by myself. It’s amazing to me how quickly we get used to living with someone else. Alex and I did long distance a few times throughout our dating relationship and for the entirety of our engagement, and yet it was so weird not having him here! The weirdest part is going to bed at night, especially since any extra noise puts me on high alert. But thankfully I was able to weld my sleeping abilities to get me to fall asleep asap so I wouldn’t be so paranoid!
Besides that, the weekend was very relaxing, and laid back. It has been a while since I wasn’t doing extensive recipe testing or photographing my latest creations on the weekend, so it was a nice change in pace. Instead, I spent the weekend decluttering and deep cleaning. I’m sure that sounds like the worst thing ever to most of you lol, but it was oddly very satisfying. I cleaned in the places that I normally just pretend don’t exist lol, like under the bed or under the kitchen sink. The amount of dust bunnies under our bed that I removed was actually kind of gross (just being honest over here). But, like, random thought - why are they even called dust bunnies?? It would make more sense if they were called dust balls or dust clumps. Just saying…
Lately we seem to be have been collecting random, excess items, and in a small apartment things feel cluttered very quickly. I got to rid of a lot of items we don’t need and clothes that I don’t wear anymore. The whole decluttering process is like a little gift to myself and I feel so much better afterwards. Does anyone else feel this way or is it just me???
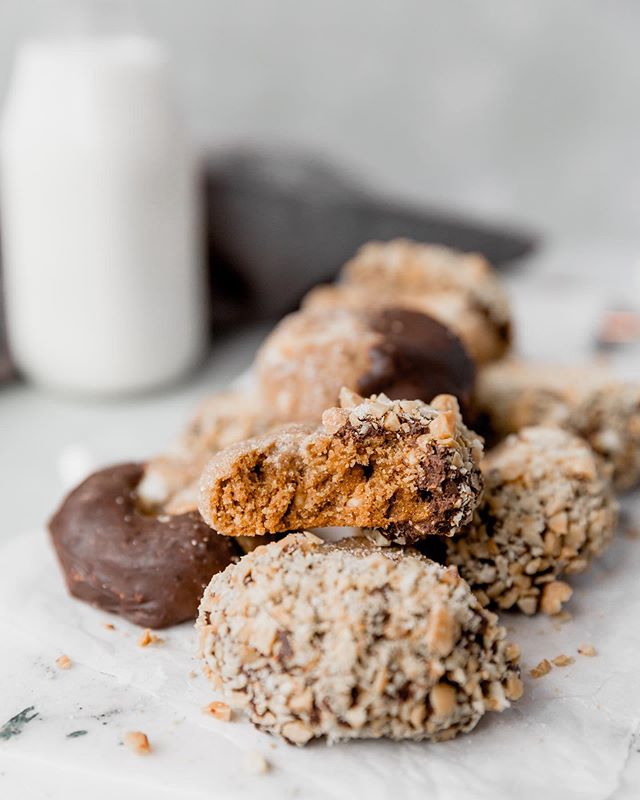
Let’s talk about CRONUTS. “Cronut” is a fusion word between croissant and donut. It was invented by pastry chef Dominique Ansel of Dominique Ansel Bakery in New York. When Alex and I went to New York we stopped by the bakery to see if there were any cronuts left for the day. We weren’t very serious in our attempts though, so when we showed up in the afternoon we knew there was little chance any would be left. And indeed there were no cronuts left, so instead we had a DKA (“Dominique’s Kouign Amann”), which was amazing!
If you enjoy challenging recipes and feeling the reward that comes with successfully making such a recipe, then this cronut recipe is for YOU! It is a two day process as there is a lot of waiting time between some of the steps. It took me a couple tries before I felt confident in my croissant dough making abilities. I wrote very detailed instructions so as to help you with this process, but the top piece of advice that I have is to READ THE ENTIRE RECIPE before you start as well as the baker’s notes. Seriously. :)
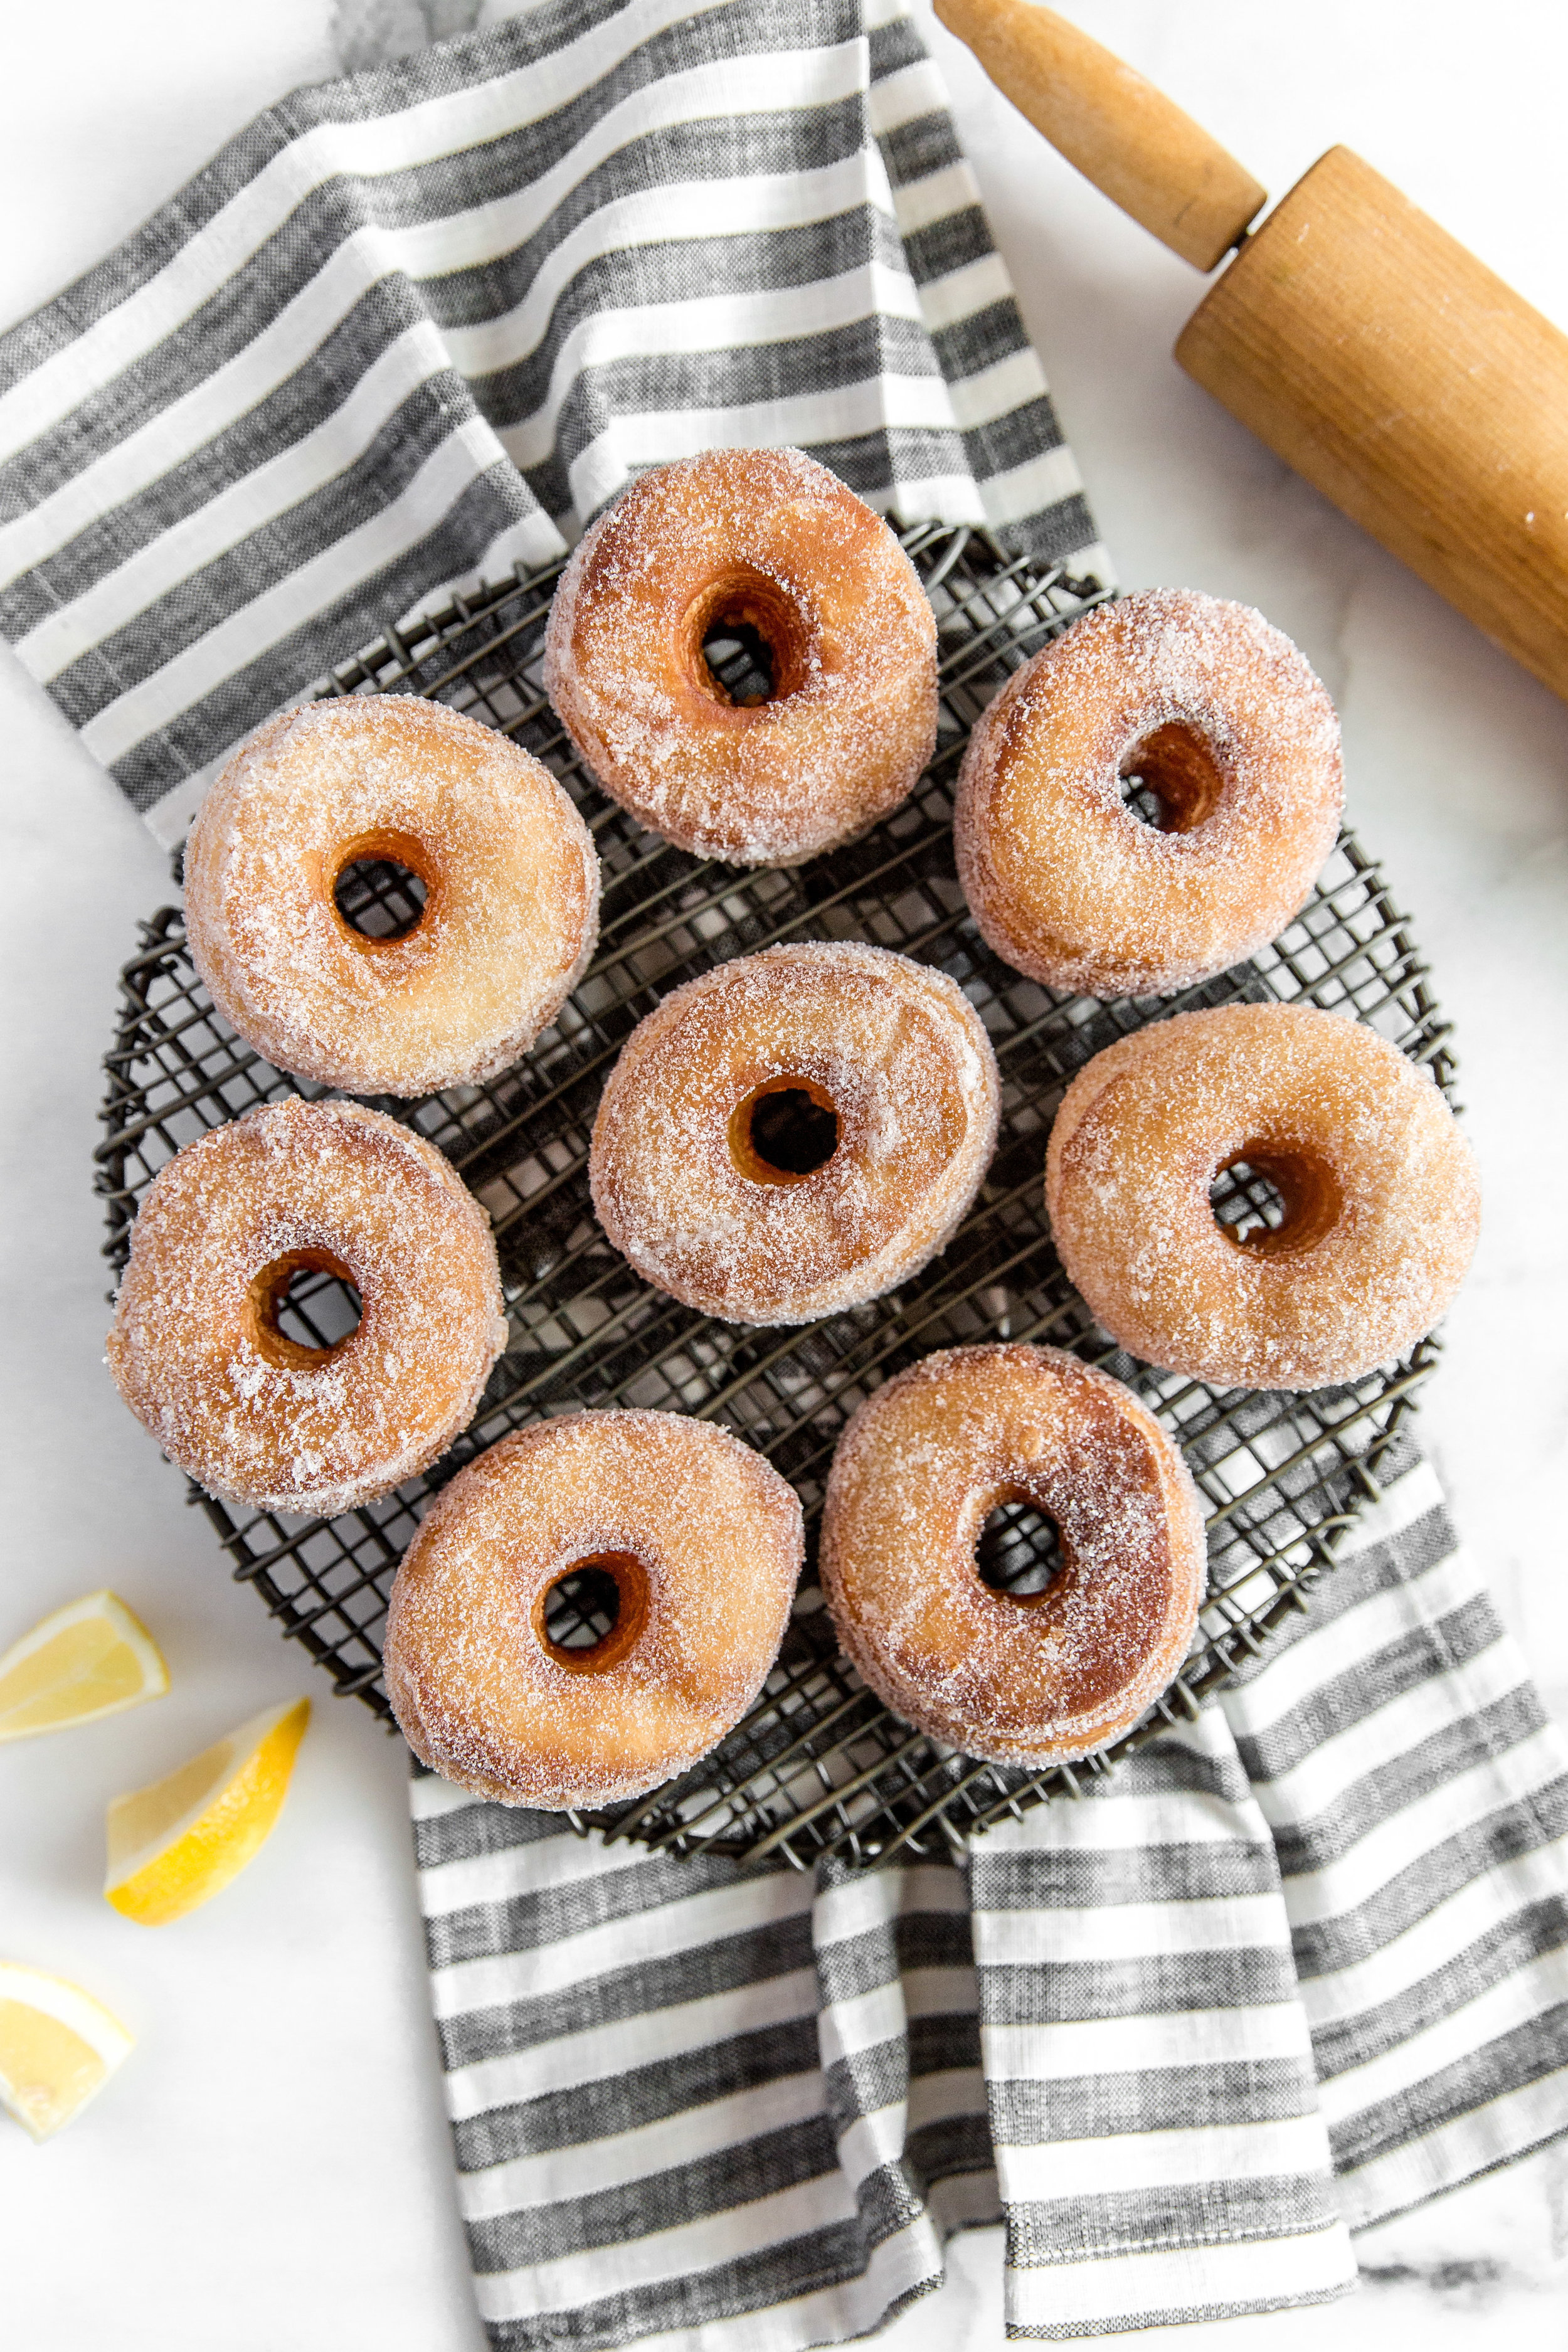
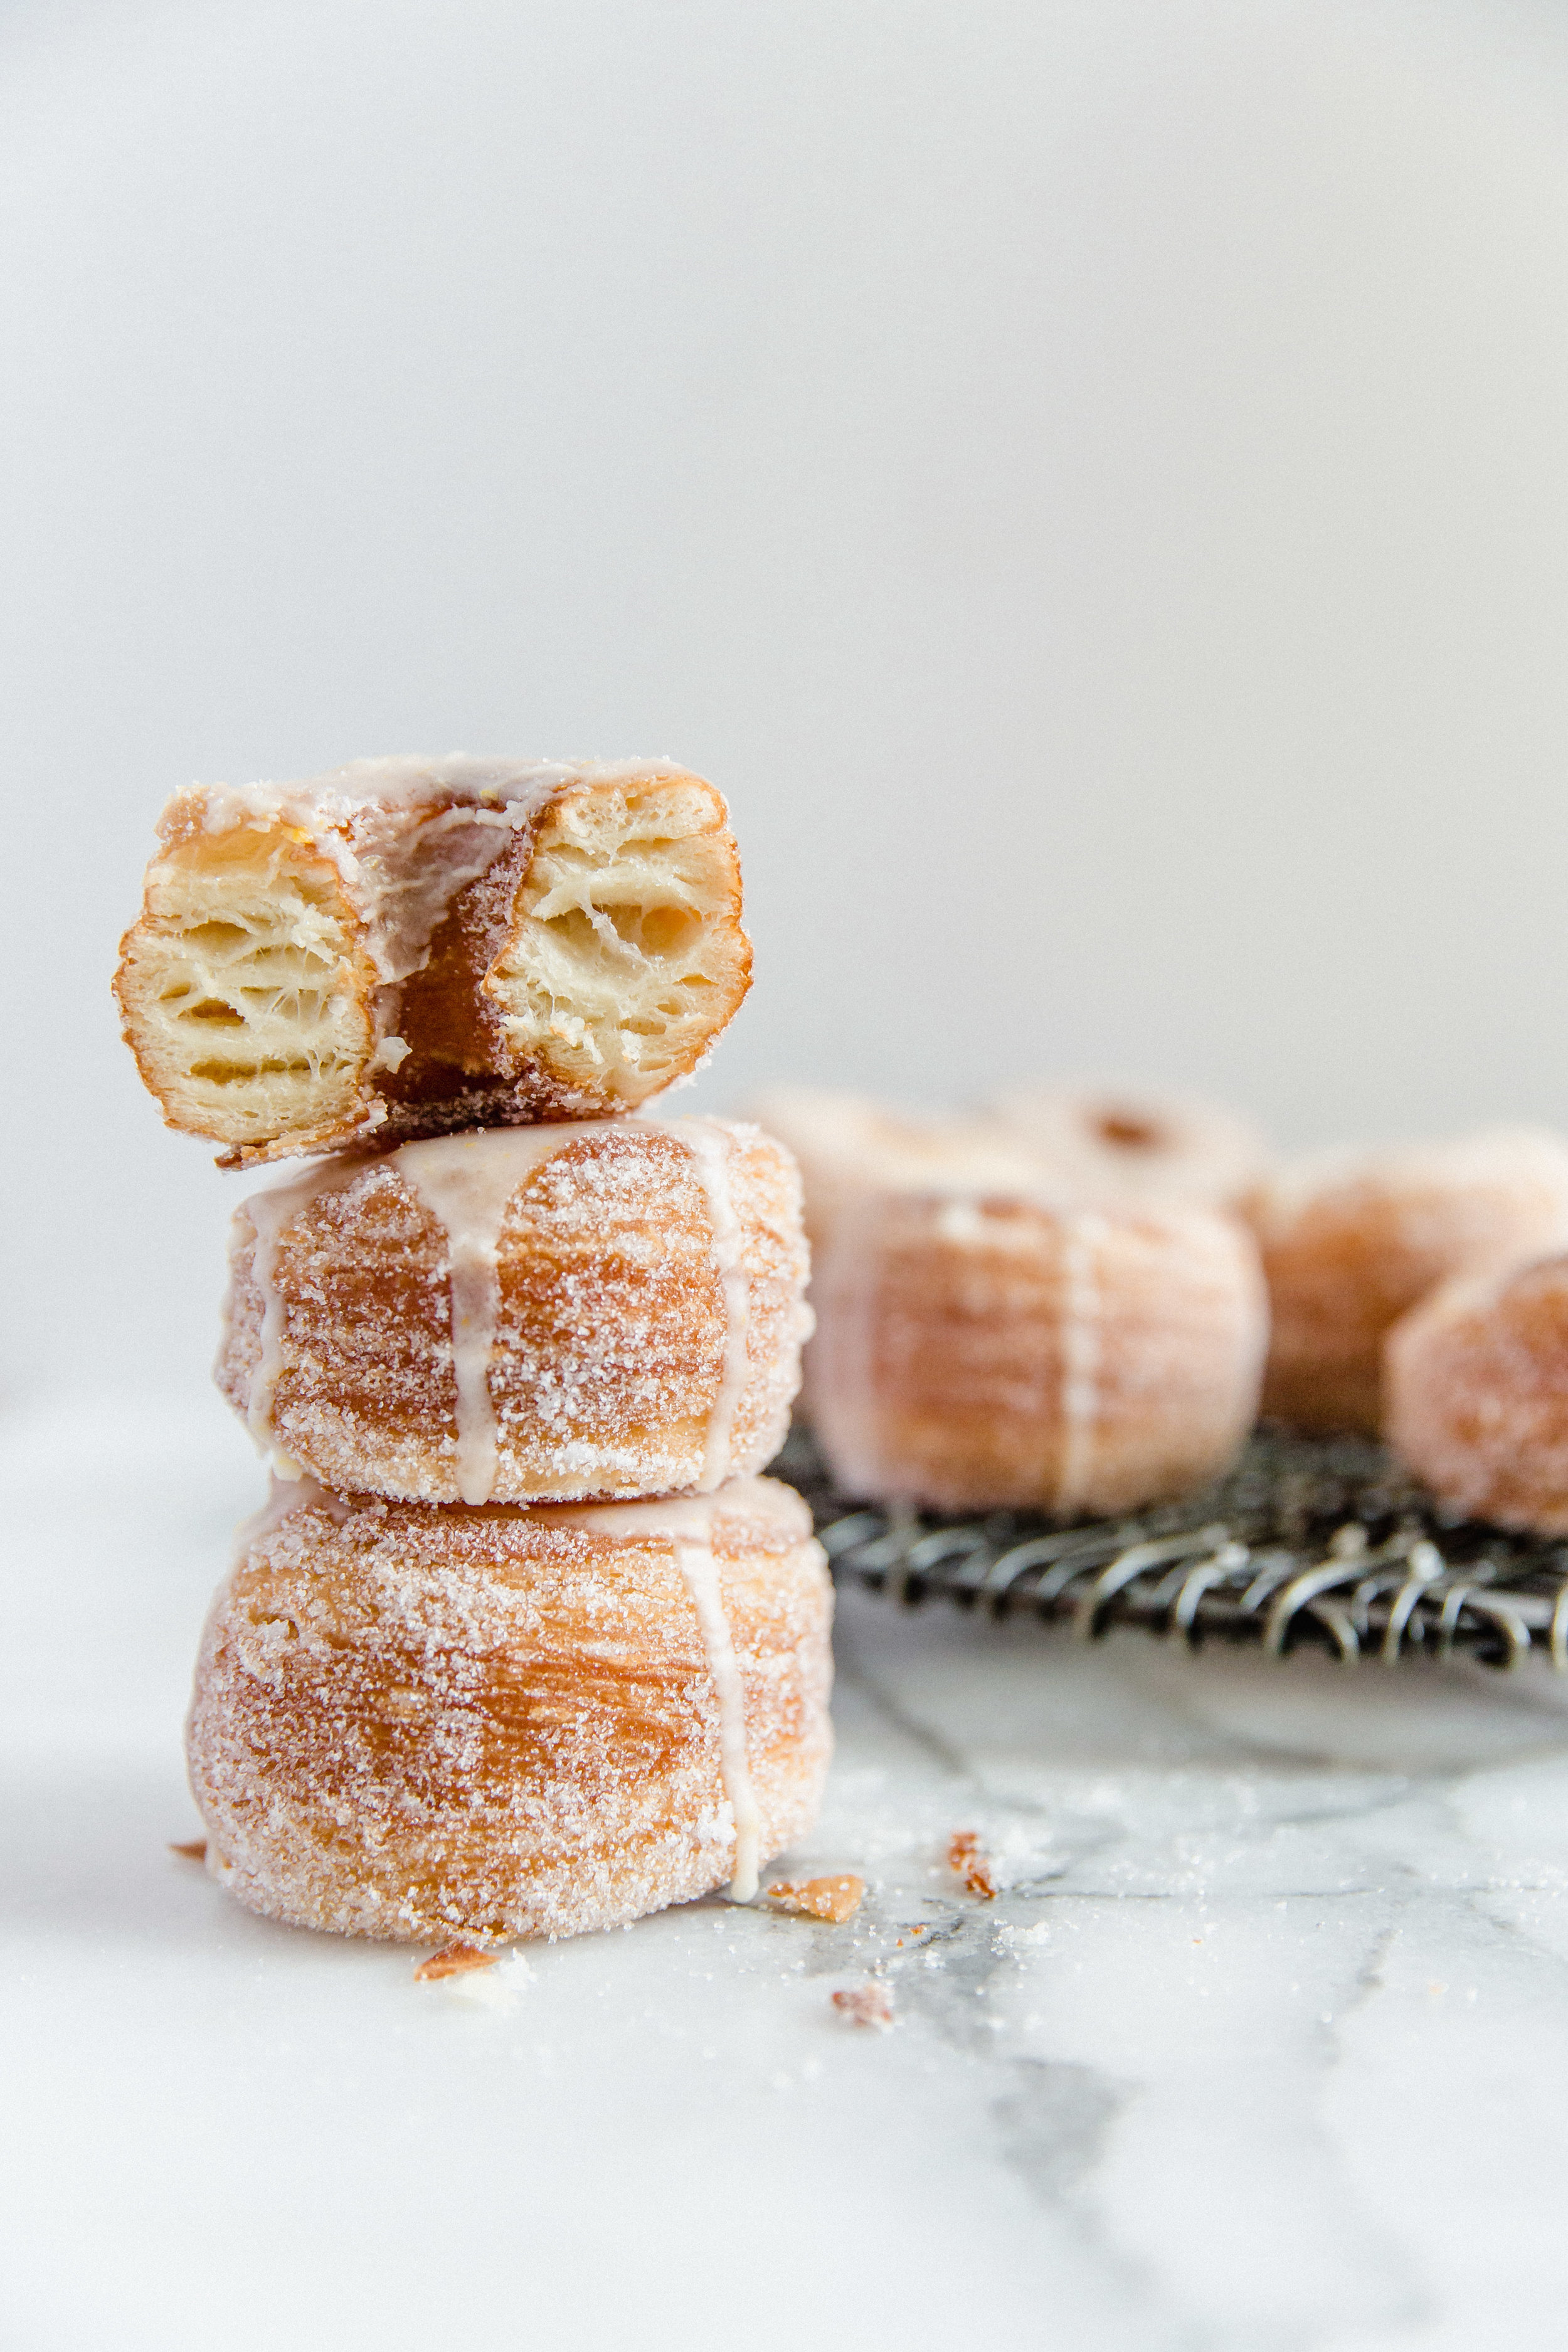
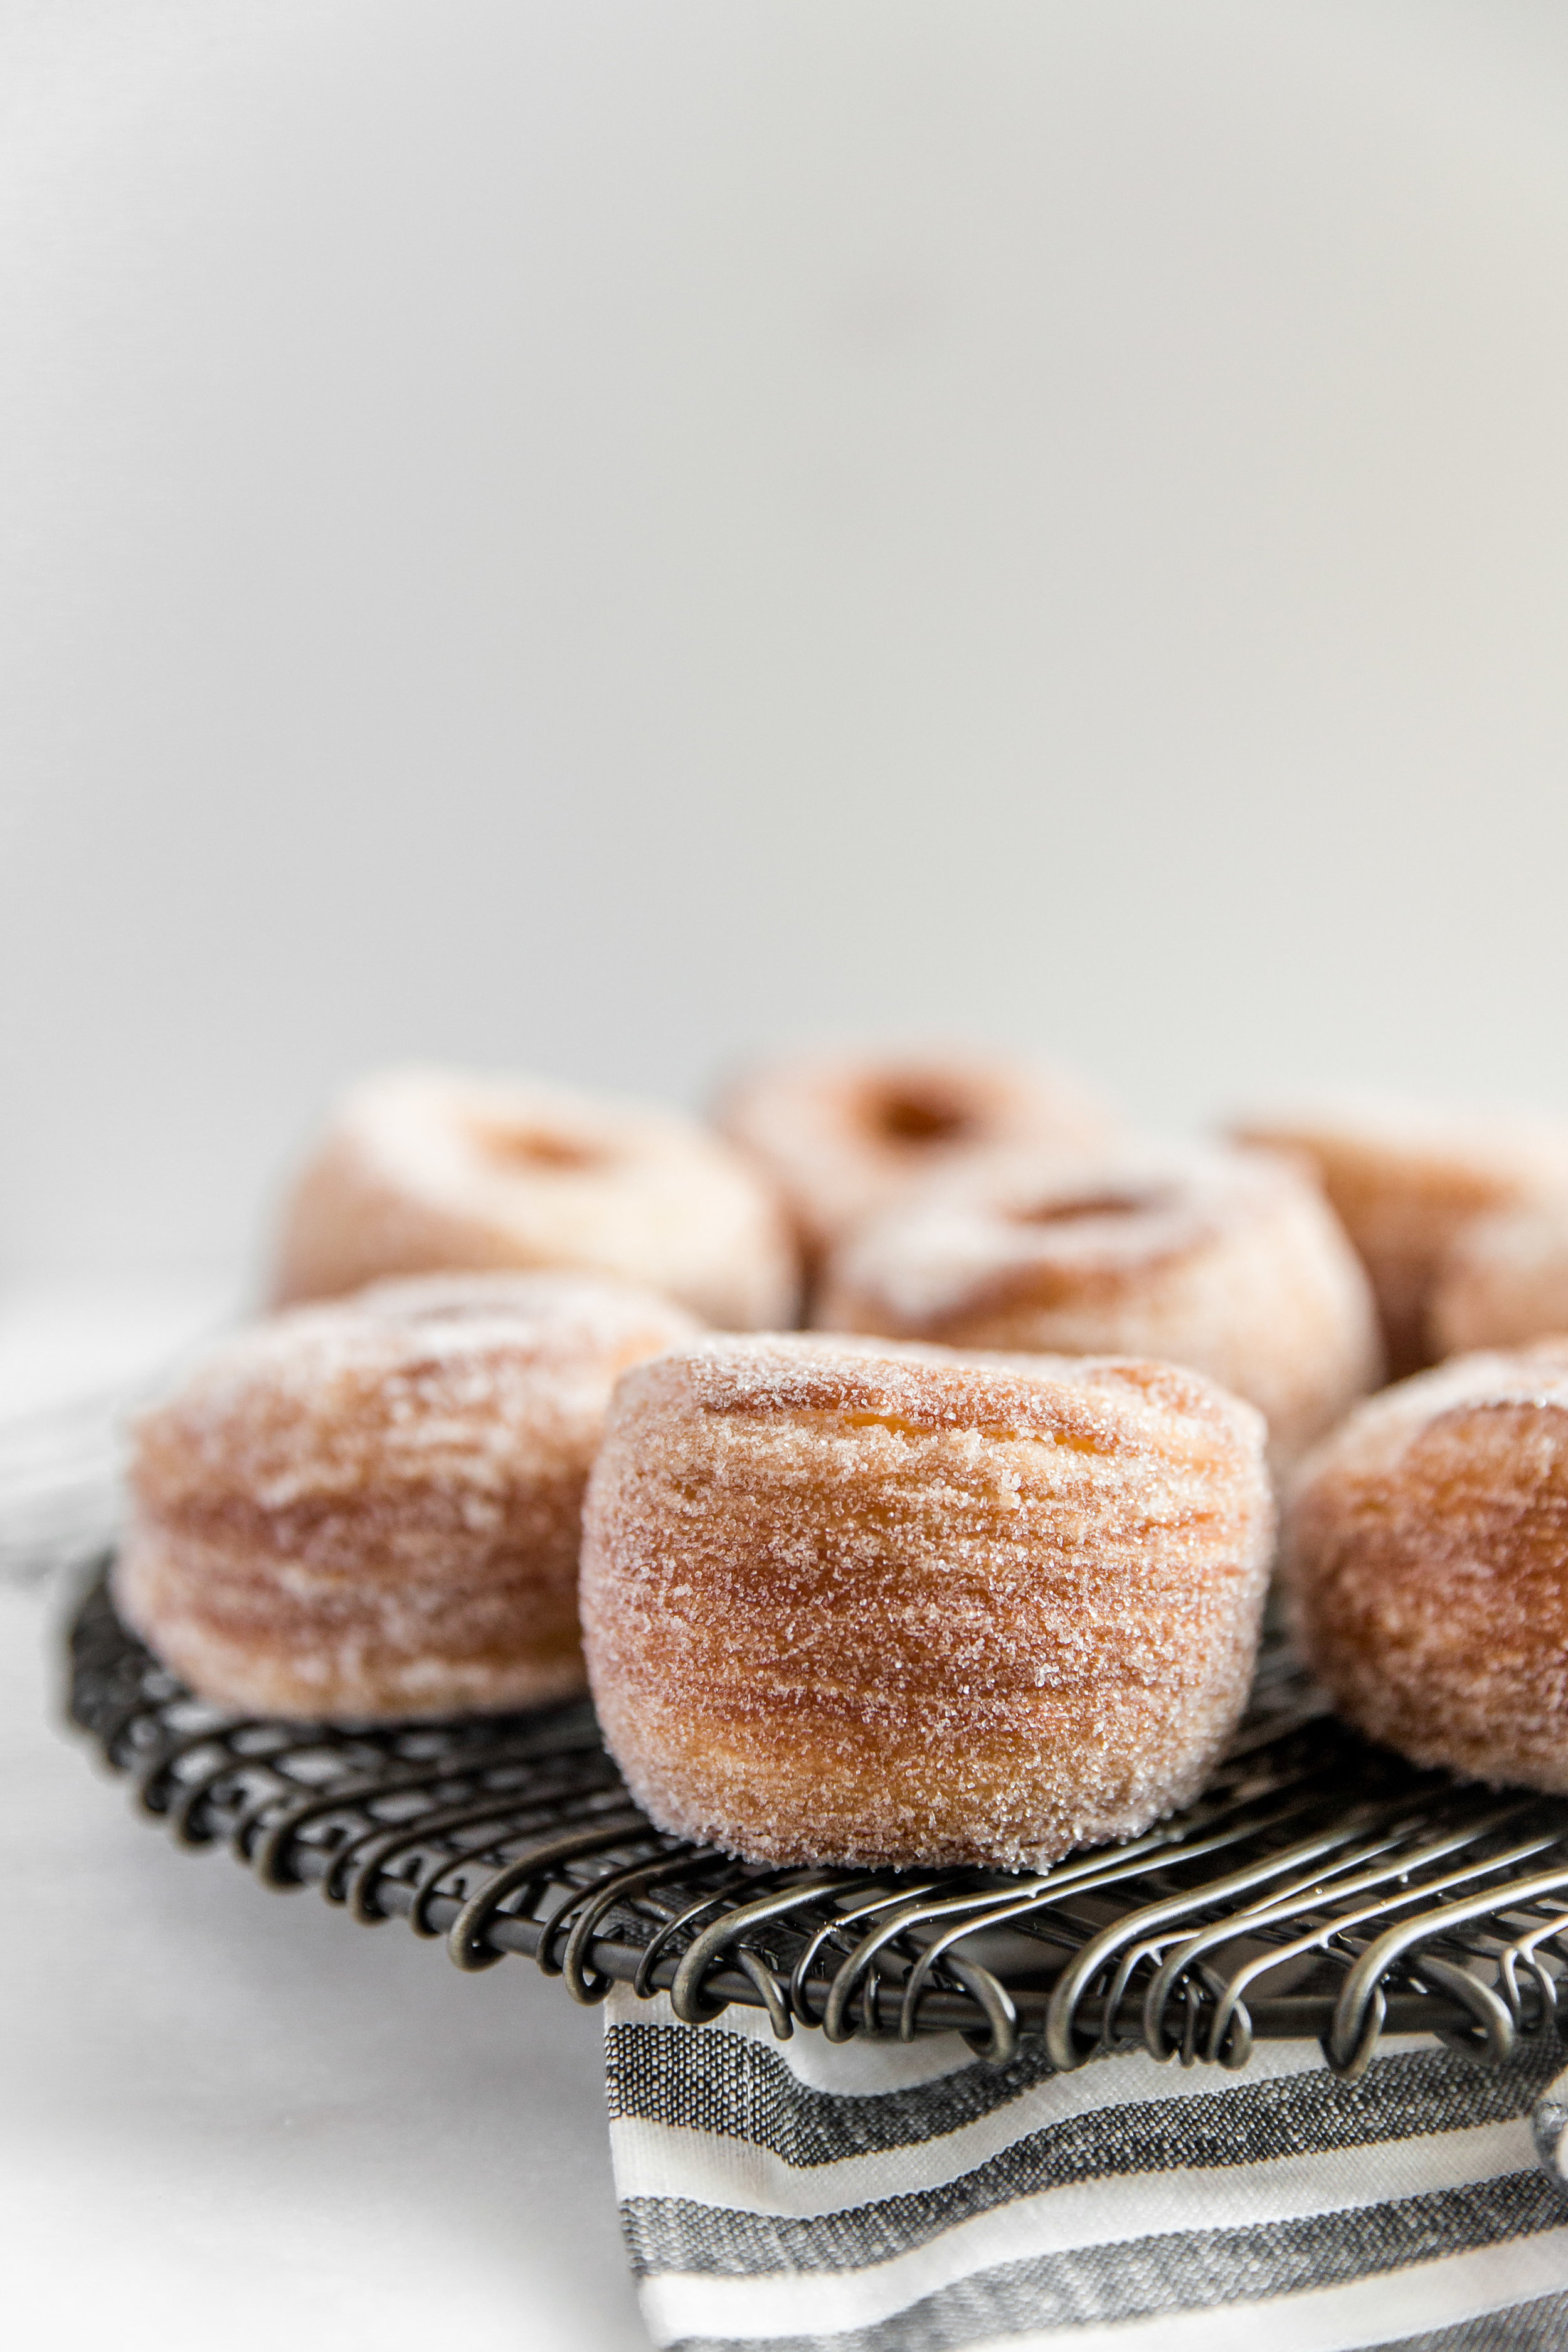
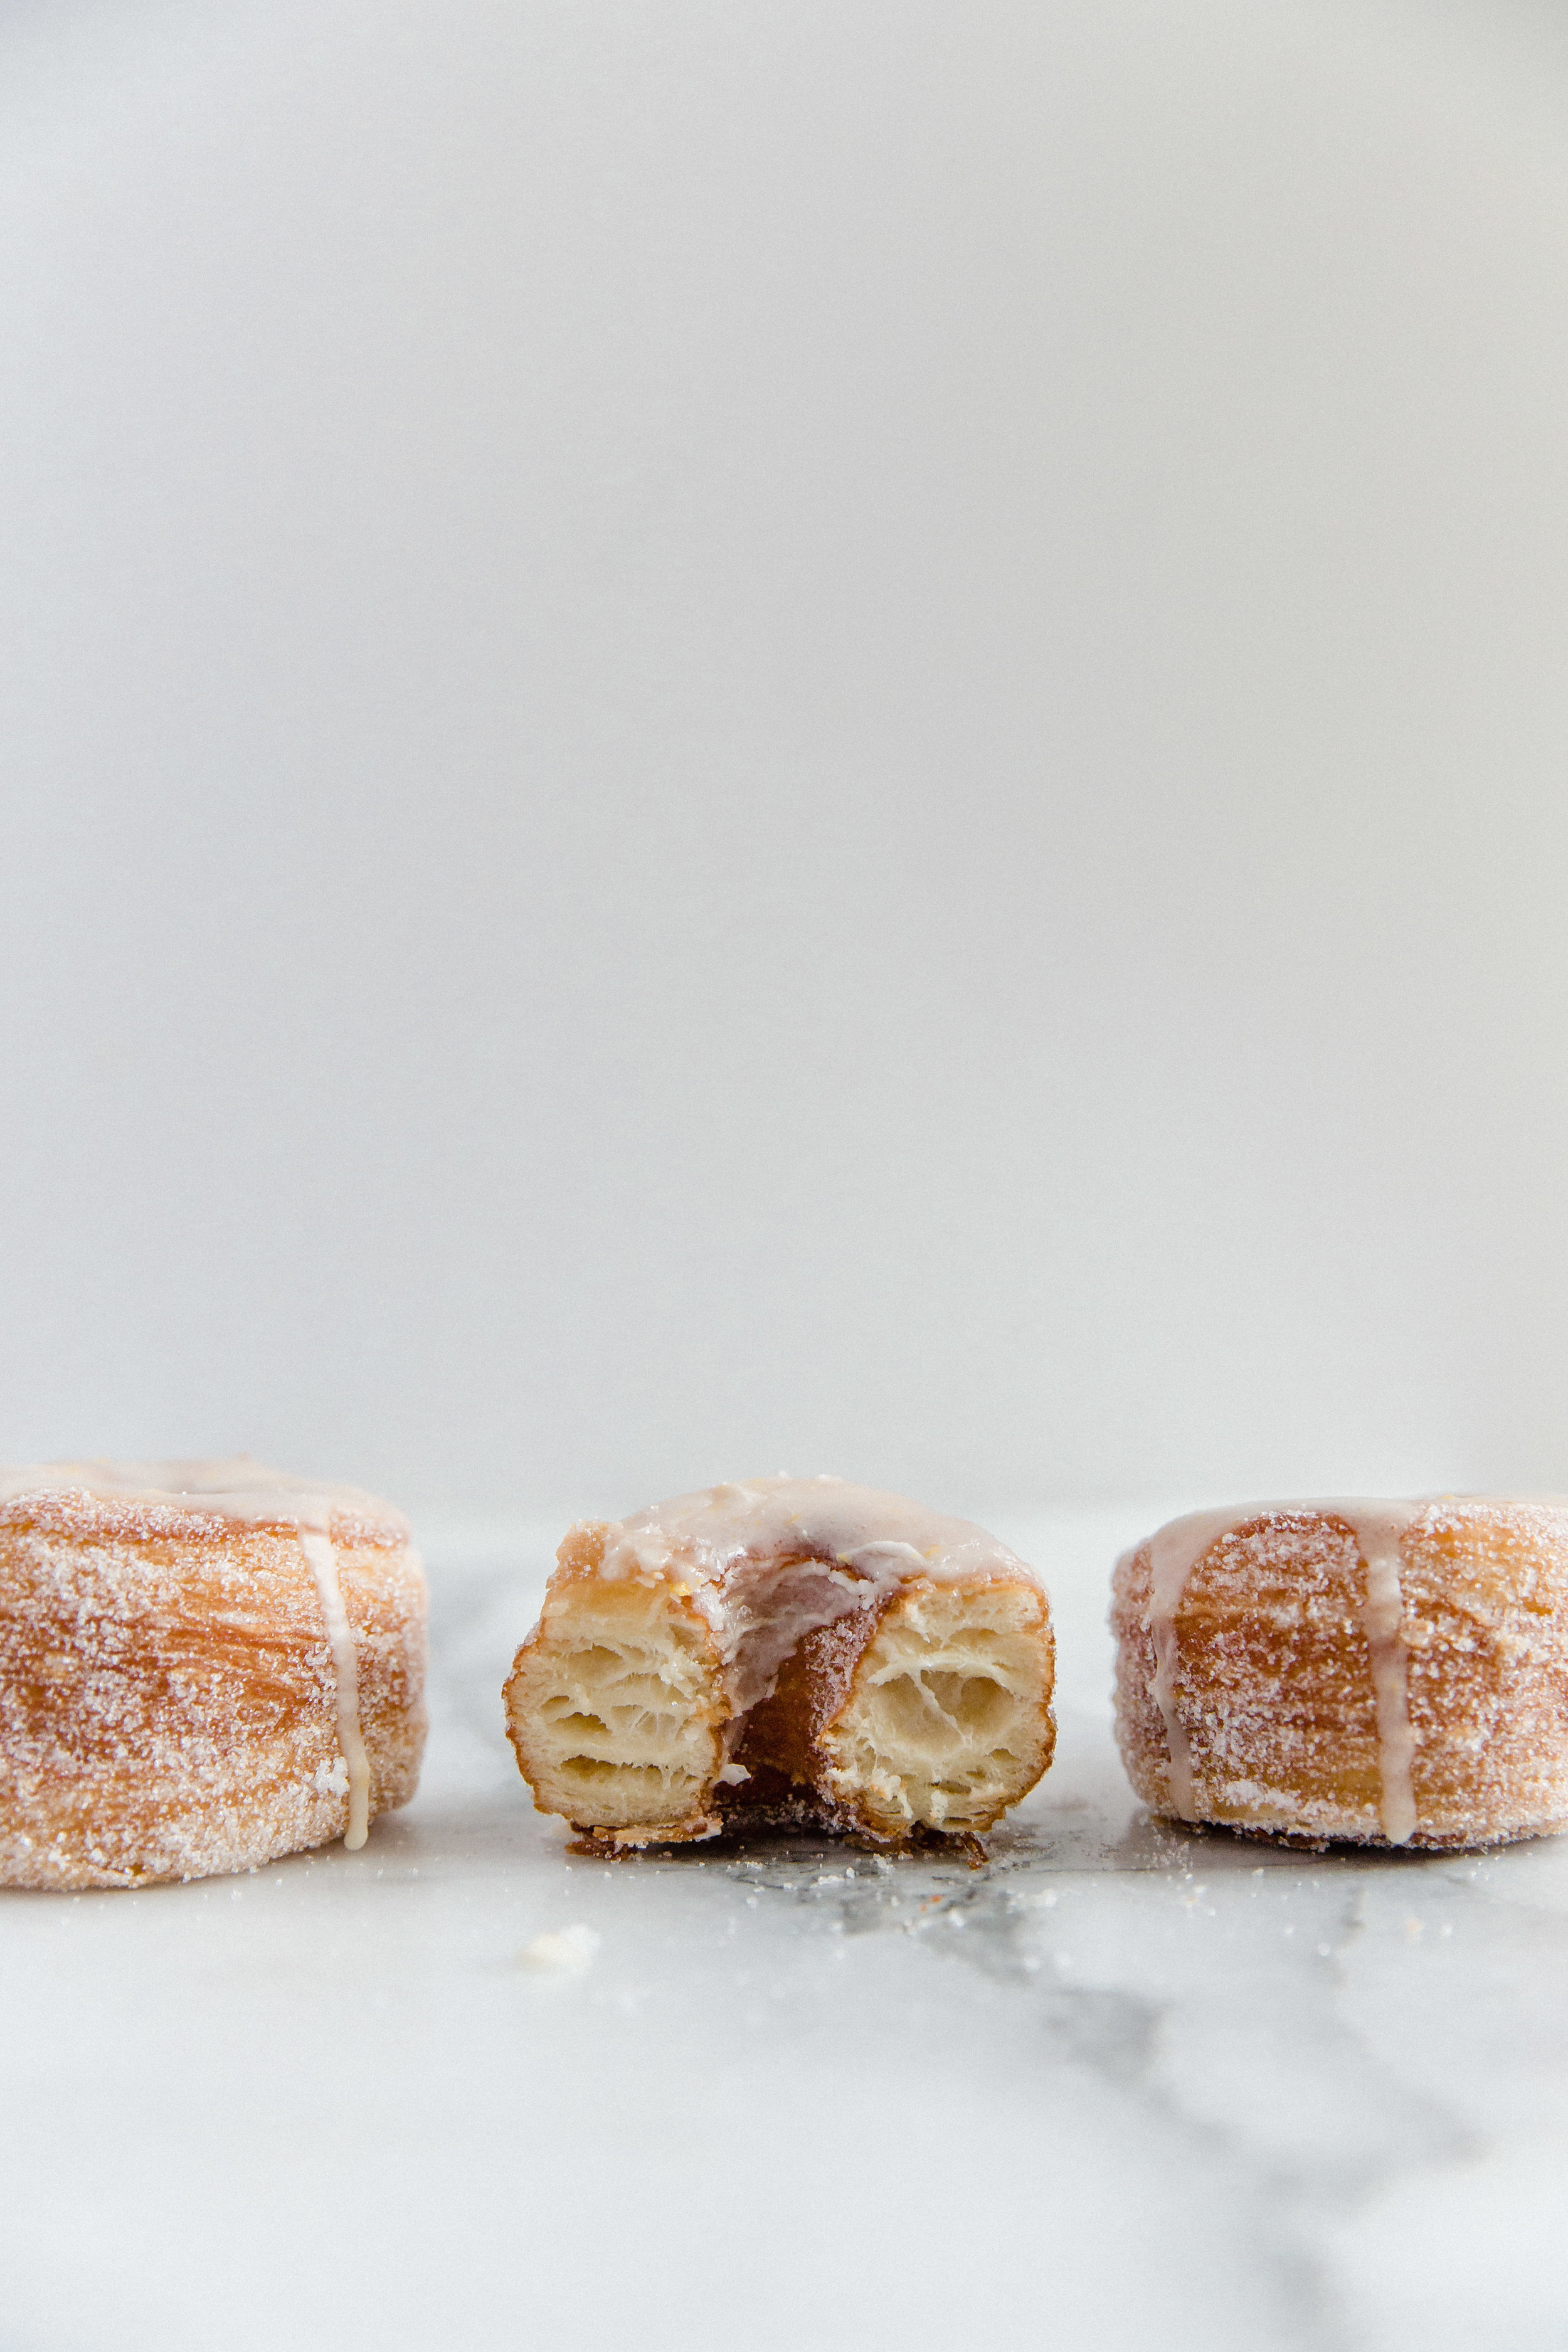
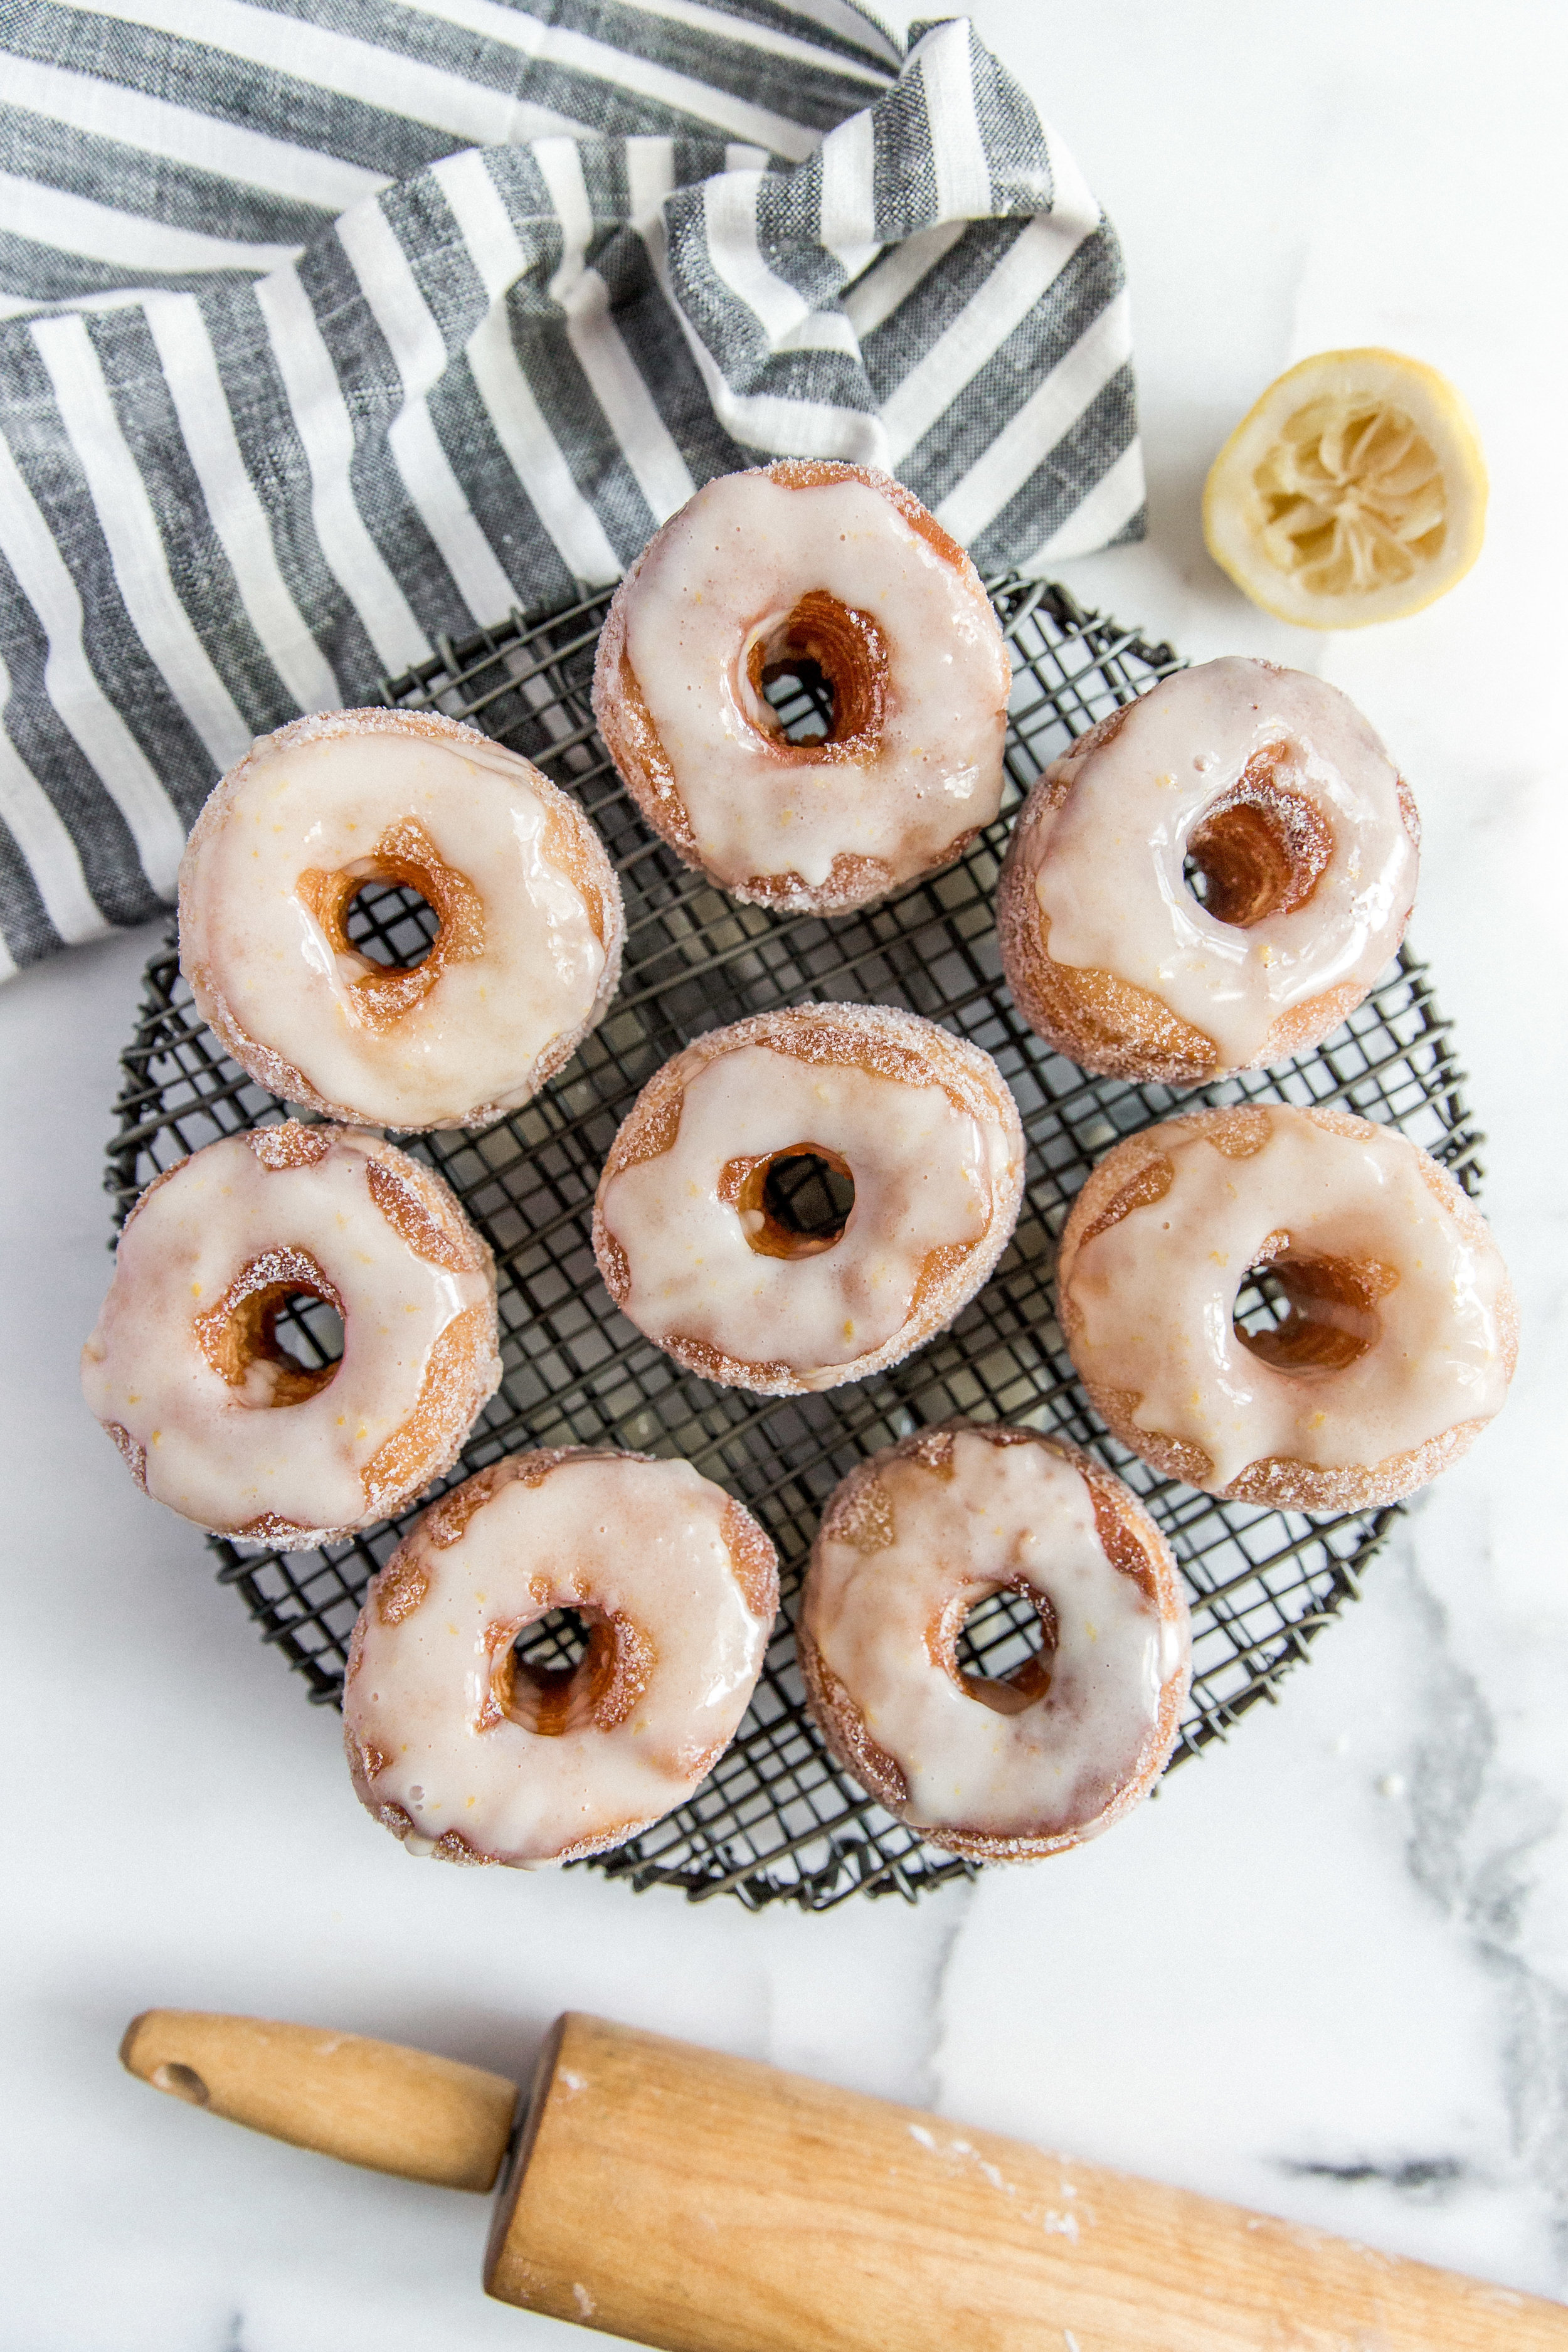
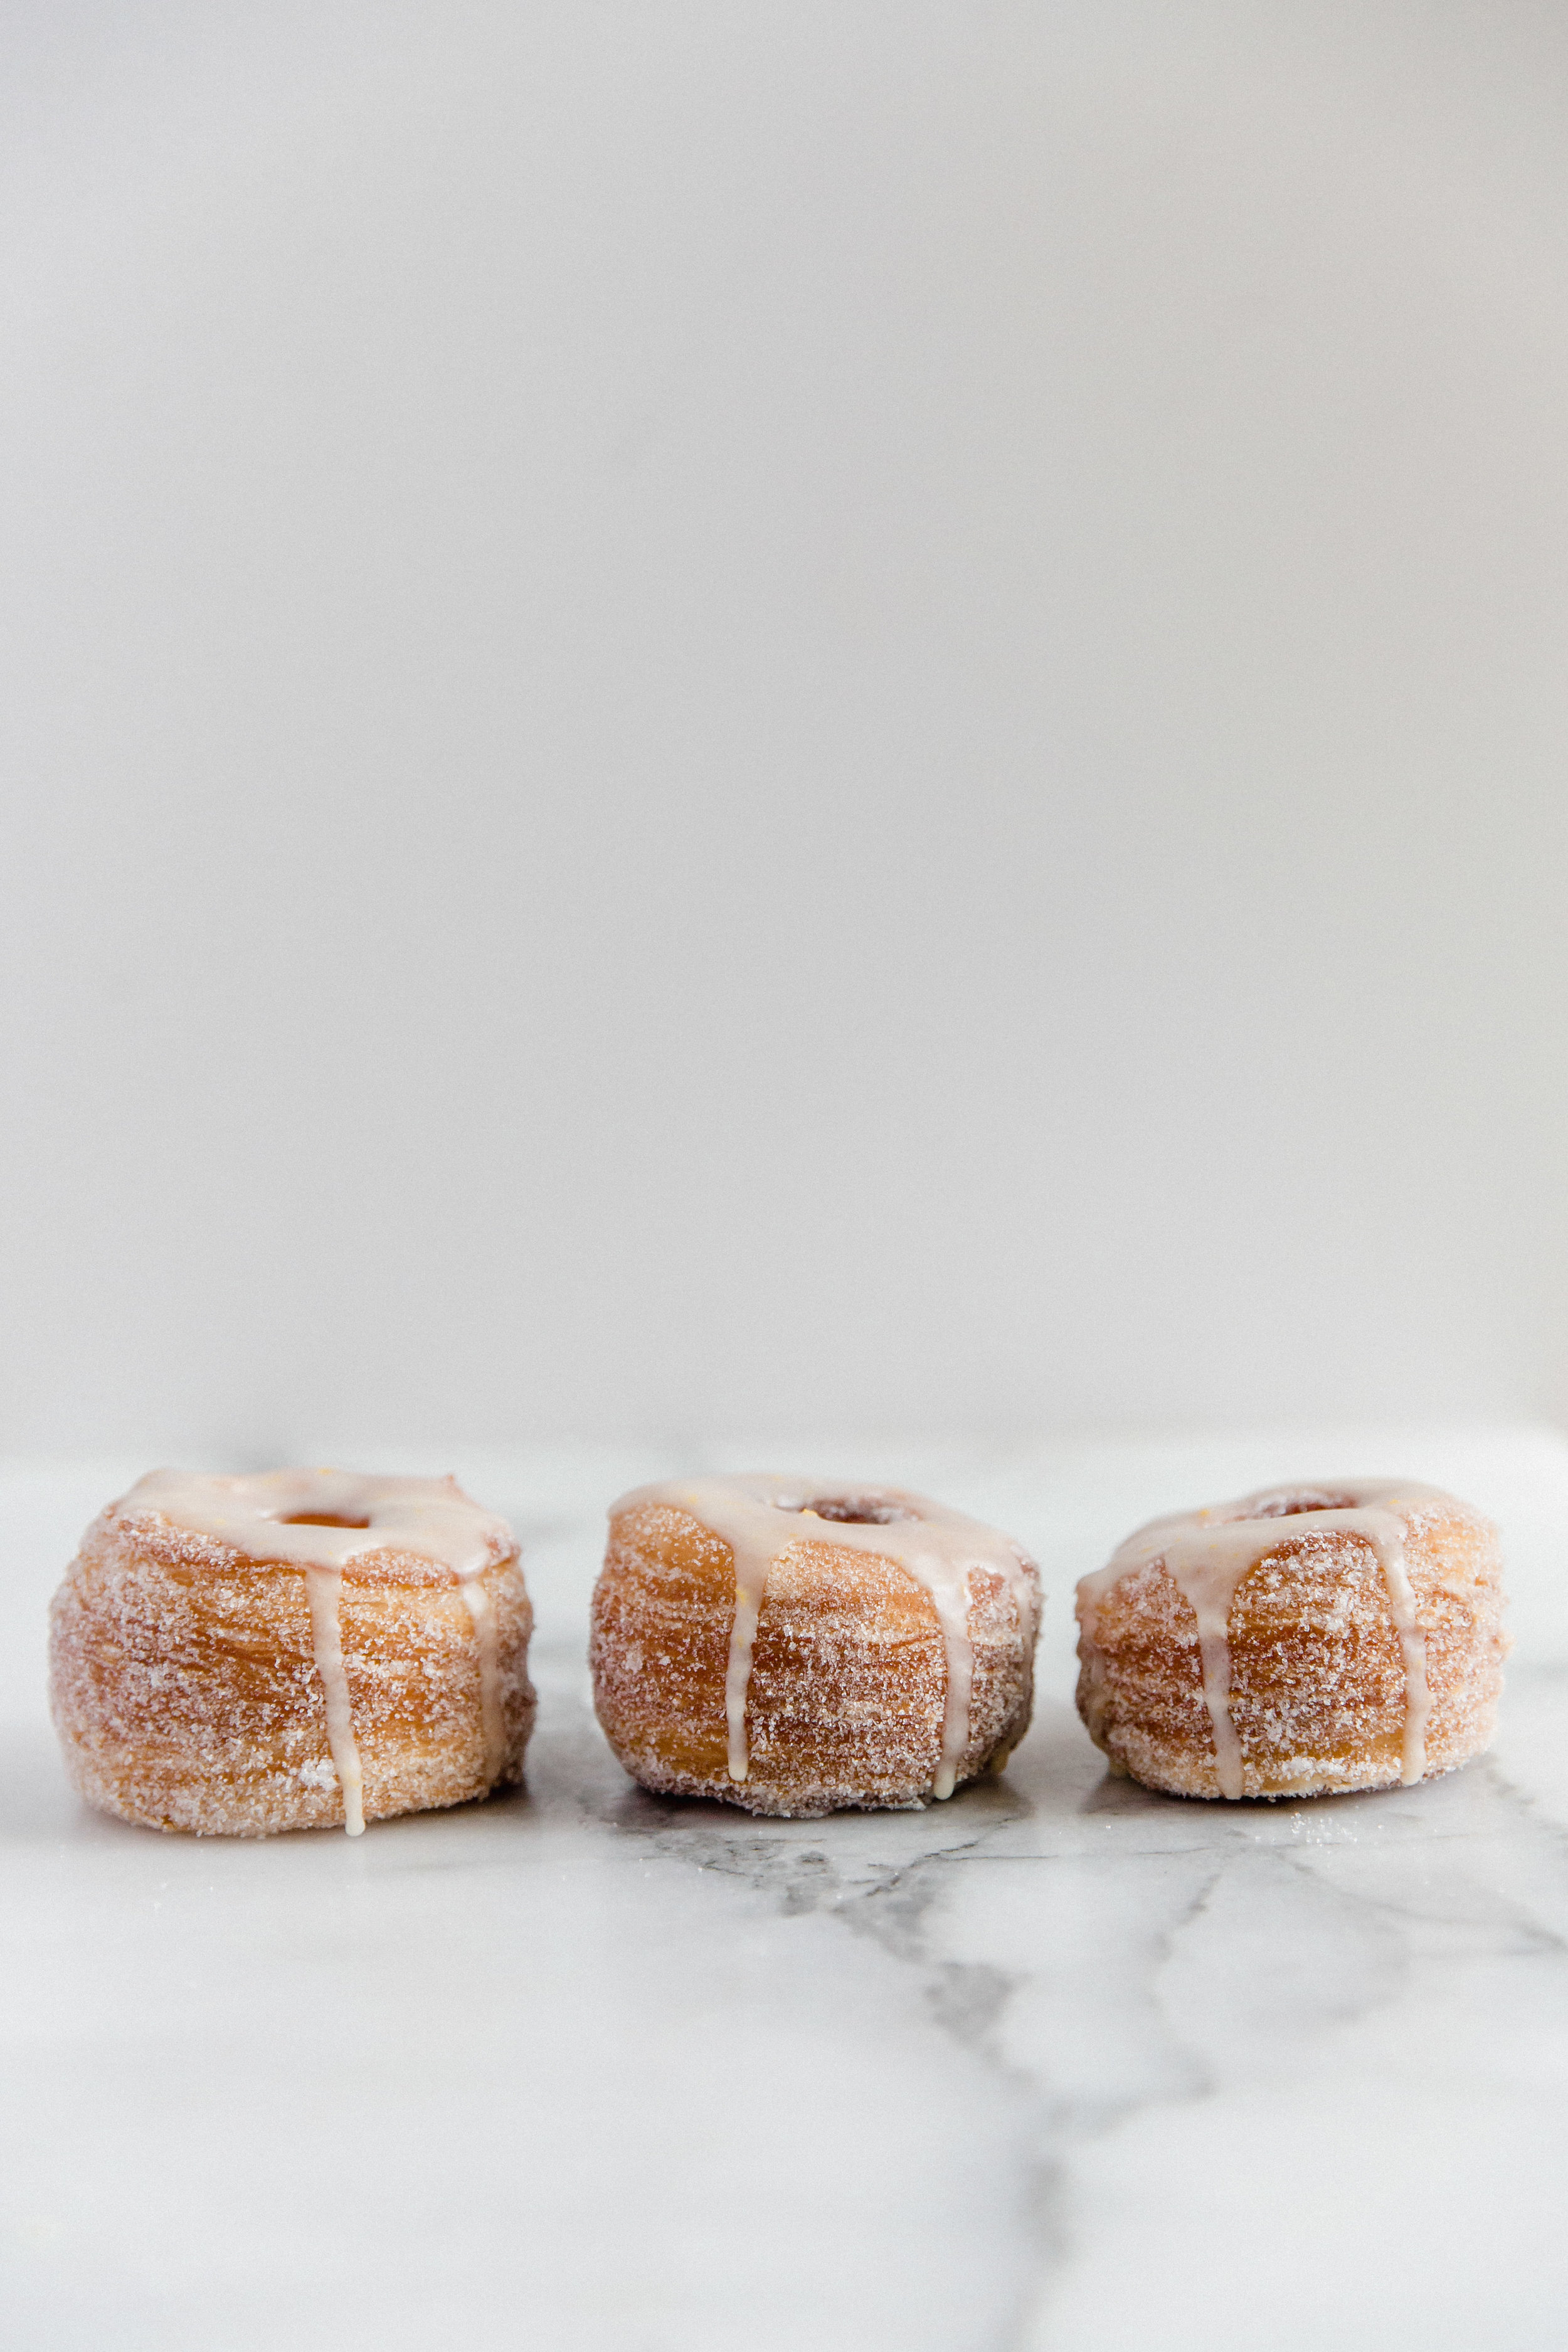
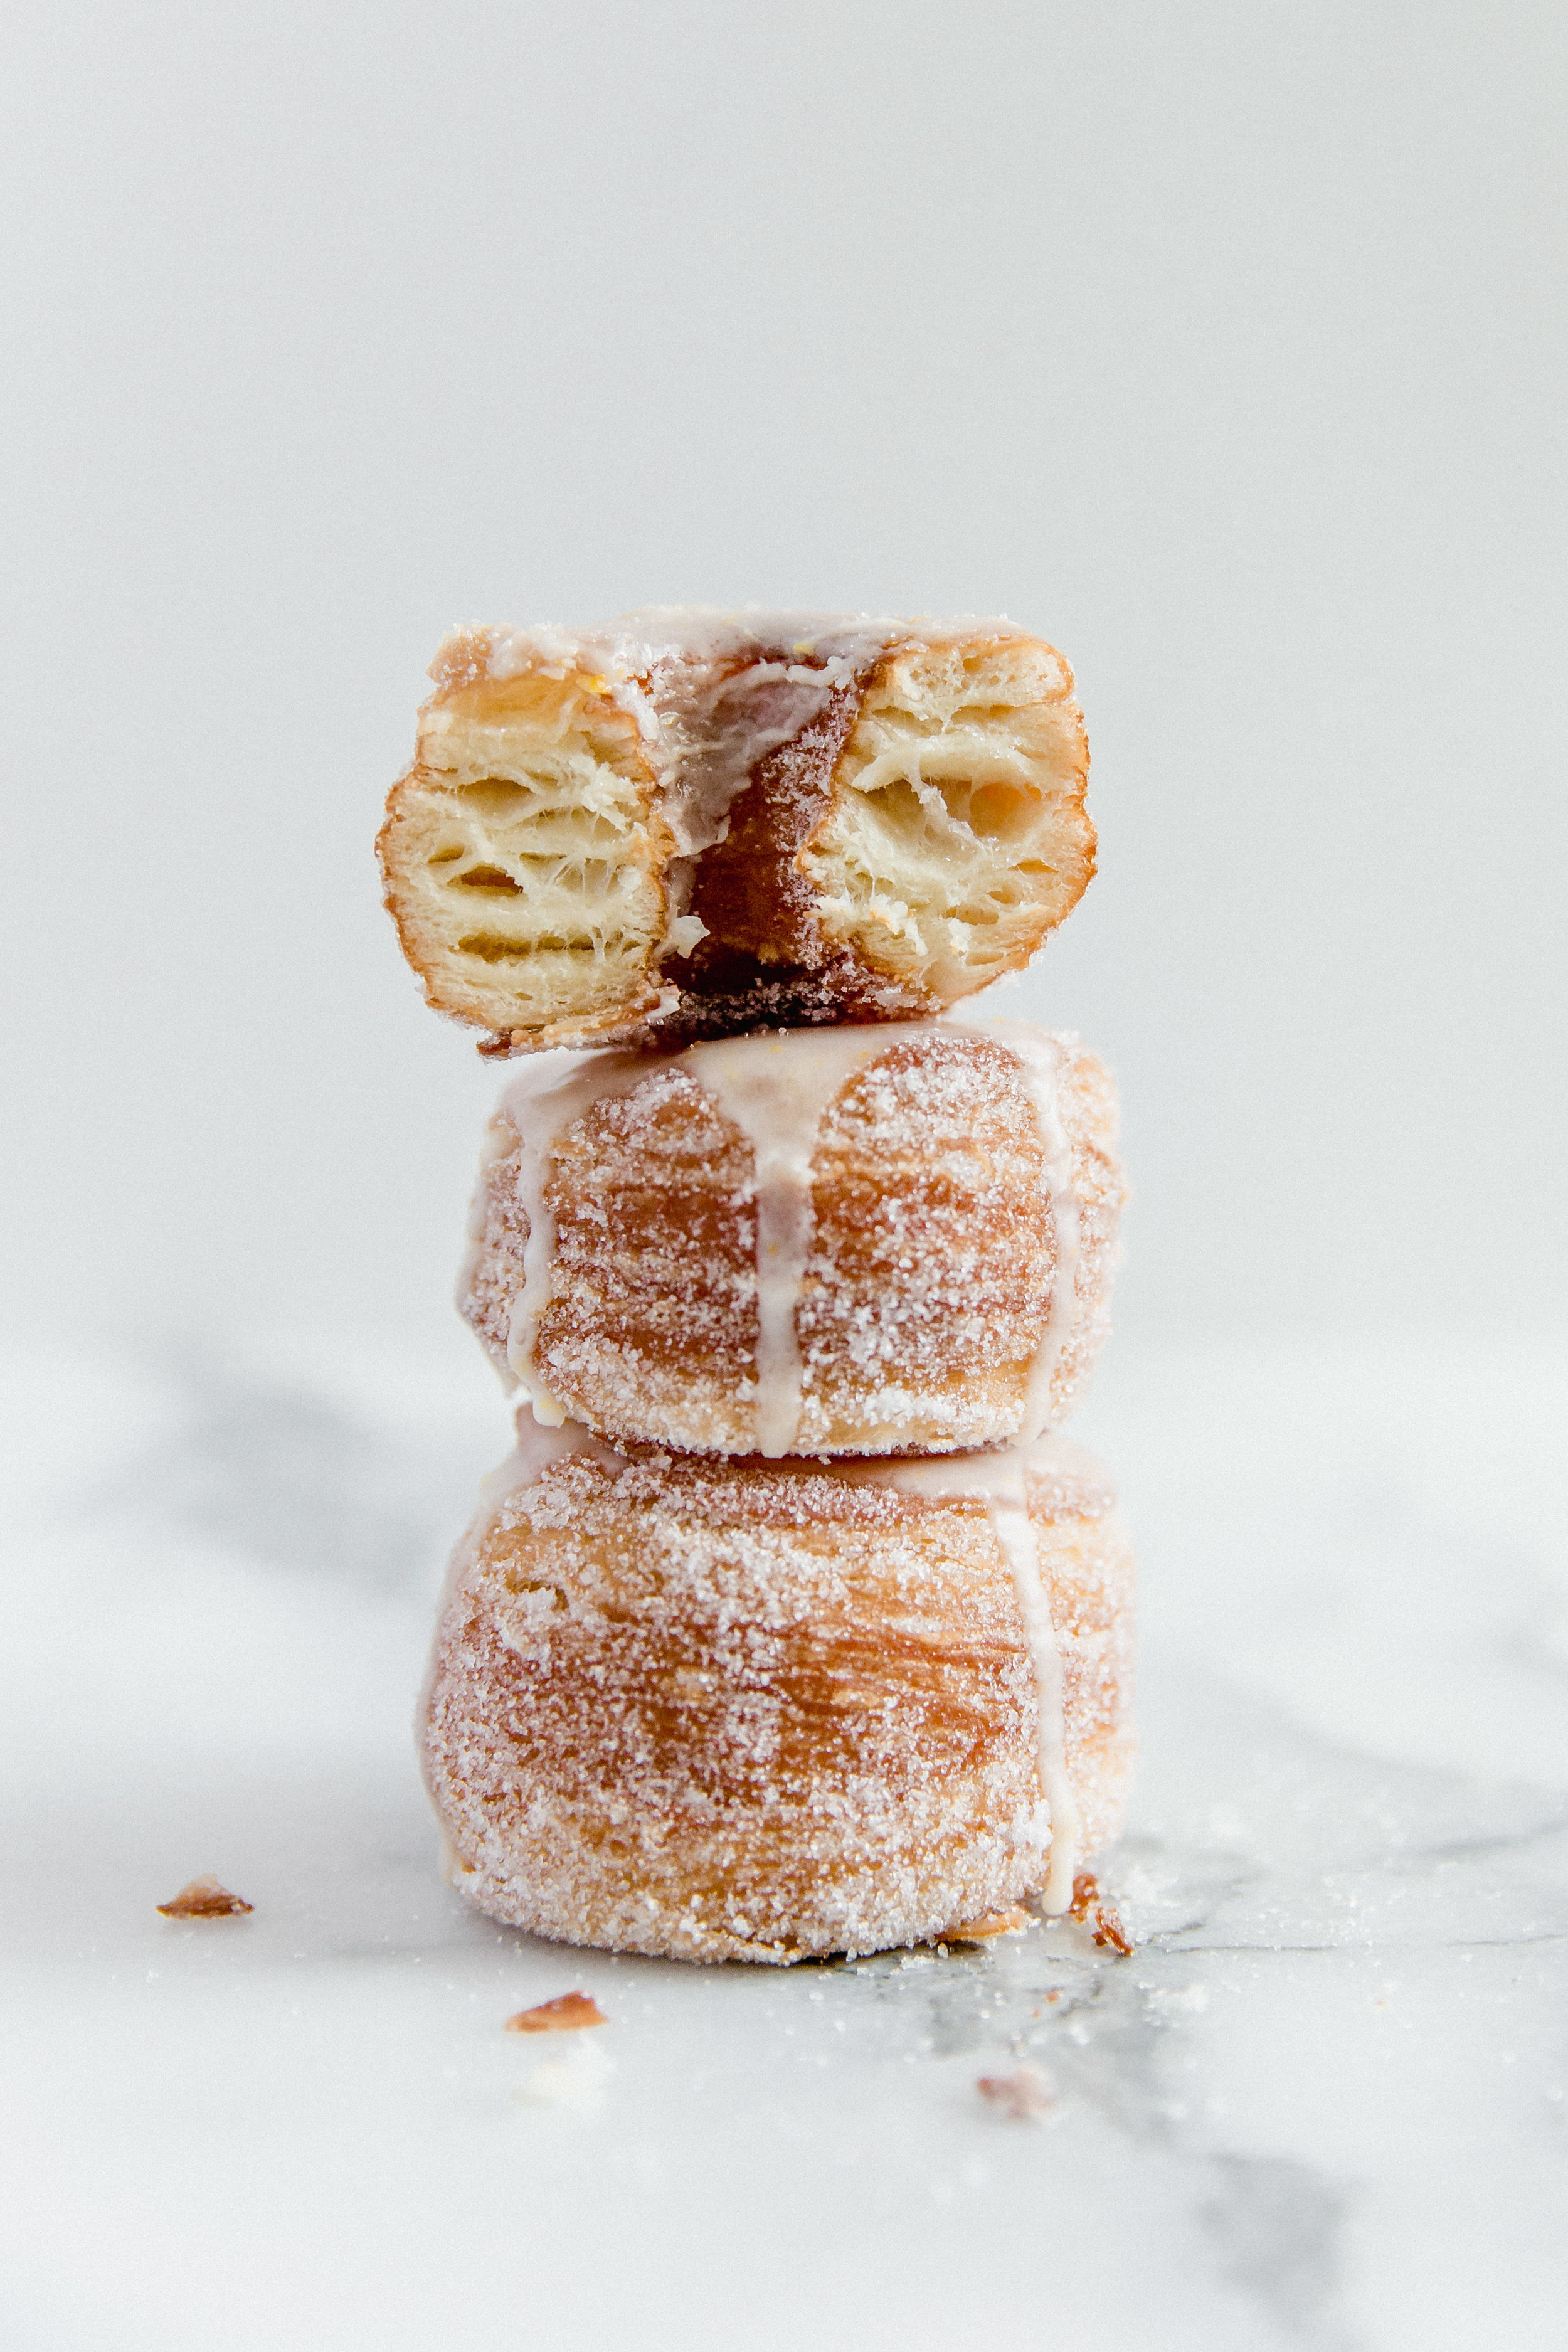
Like croissants, these cronuts consist of buttery, flakey layers. (I enjoyed eating these cronuts layer by layer!) Deep fried, these cronuts have a crisp exterior, while the inside remains soft and delicate. The donuts are rolled in sugar and topped with a lemon glaze. Each donut is rather tall as you can visibly see from the exterior the endless number of layers within. And of course, don’t forget about the donut holes! In reality they look nothing like traditional donut holes because the numerous layers expand as they cook, creating a caterpillar like shape. But they are just as delicious as the cronut.
These cronuts truly are a labor of love. Either make them for yourself to enjoy or gift them to a friend or loved one. They are sure to impress whoever you give them too! Just know, that they are best the same day. ENJOY!!

Homemade Cronuts with Lemon Glaze
Prep time:
Total time:
Serves: 8
Dough Ingredients:
- 1 cup milk
- 1/3 cup water
- 1/4 cup + 1 Tablespoon sugar, divided
- 1 active yeast package
- 250 grams (~1 1/2 cup + 2 Tablespoons) all-purpose flour
- 250 grams (~1 1/2 cup + 2 Tablespoons) bread flour
- 1 Tablespoon salt
Butter Block Ingredients:
- 1 cup unsalted butter, cool to touch
- 1/2 cup all purpose flour
Glaze Ingredients:
- 1 1/4 cups powder sugar
- 2 Tablespoons milk
- 1 Tablespoon lemon juice
- Zest of 1 lemon
- 1/2 teaspoon vanilla
Instructions:
- MAKE THE DOUGH: In a small bowl or large pyrex, combine the milk and water, and microwave until the temperature is 105-115 degrees F. Stir in 1 Tablespoon sugar. Sprinkle the yeast on top. Let sit for 5 minutes until foamy. (When the sugar and yeast react together, gas bubbles are released thus creating foam, and the mixture will smell of bread. If you do not see any reaction after 5 minutes, your yeast could be bad and you will need to start over.)
- In a standing mixer fitted with a dough hook, combine the flours, 1/4 cup sugar, and salt. Make a well in the middle. Pour into it the yeast mixture.
- Mix on low until it comes together into a ball (~2 minutes).
- Increase the speed to medium and kneed for another 5 minutes. Take the butter out of the refrigerator and set aside. Check the consistency of the dough by gently poking it with your finger. The dough is ready when it does not stick to your finger. However, if the dough sticks to your finger, add more all purpose flour, 1 Tablespoon at a time, kneeding briefly after each addition. (*)
- Tip the dough onto a lightly flour surface. Form the dough into a ball, then transfer to a large, lightly oiled bowl. Cover the bowl with plastic wrap. Refrigerate for 1 hour. As you wait, make the butter block.
- MAKE THE BUTTER BLOCK: Clean your standing mixer bowl, and switch out the dough hook attachment for the paddle attachment. In the standing mixer on low-medium speed, beat the butter and 1/2 cup all purpose flour until smooth. Do not beat on high speed as you do not want to incorporate air into the butter.
- Lay a large piece of plastic wrap on the counter. Lightly sprinkle with flour. Transfer the butter onto the middle of the plastic wrap. Fold over half of the plastic wrap, as if you were closing a book, creating a flat edge of butter along the fold. Use your hands to gently spread the softened butter into a 7" square. Fold over the 3 other sides to enclose the butter. Transfer to a flat surface, such as a small cutting board. Refrigerate until ready to use.
- Transfer the dough to a lightly floured surface. Use a paper towel to gently soak up any extra oil from the dough. Roll the dough into a 10" square. Place the butter block in the middle of the square, like a diamond.
- Cut halfway through the dough at the butter's edges. Roll out the "cut" corners 1-2 times, until long enough to cover the butter when folded.
- Stretch and fold the dough edges over the butter, and pinch the edges together where they meet on the sides and in the middle.
- Flip the dough over and position it so it looks like a square instead of a diamond. Using a rolling pin, firmly press down along the dough, creating wavy indentations (*). Roll into a 10"x20" rectangle, with the short end facing you. Along the way, ensure that the dough is not sticking to the surface underneath by adding a light sprinkle of flour as needed.
- Use a dry brush to get rid of excess flour. Fold the bottom third of the dough up, brush off excess flour, then fold the top third of the dough dough, again brushing away excess flour. Pinch the sides together. Turn the dough 90 degrees so that the open edge or flap is on the right, like a book. Transfer to a small baking sheet, wrap in plastic wrap, and refrigerate for 1 hour. This was your first turn.
- Do the second turn: remove the dough from the refrigerator, and return to your lightly floured surface. Position the dough as it was, with the flap on the right like a book ready to be opened. Roll the dough into a 10"x20" rectangle, with the short side facing you. Brush away the excess flour. Fold the bottom third up, and the top third down, brushing away the excess flour in between. Turn the dough 90 degrees, so that the flap is on the right. Return to the baking sheet, cover with plastic wrap, and return to the refrigerator for another hour.
- Repeat the above step two more times (for a grand total of 4 turns), but for these turns, roll the dough into a 9"x16" rectangle rather than a 10"x20" rectangle.
- After turn #4, refrigerate the dough overnight.
- The next day: On a lightly floured surface, roll the dough into a large rectangle, with 1/2" thickness, flipping the dough throughout to get an even roll, and adding a sprinkle of flour with each flip.
- Use a donut cookie-cutter (*) to cut out 8 donuts. (Dip the cookie-cutter in flour between each cut to prevent sticking, allowing for easy release). Gently transfer to a parchment lined baking sheet, placing 2" apart.
- Using a 1" cookie-cutter or a piping tip, cut out donut holes from the remaining dough. (Again, dip the cookie-cutter in flour between each cut to prevent sticking). Transfer the donut holes to a second parchment paper lined baking sheet. Cover both baking sheets with plastic wrap, and refrigerate for 2-3 hours.
- DEEP FRY: In a large saucepan, heat 2 1/2" - 3" of oil until it is 350F. (*) Using a spider whisk, gently place the donuts into the oil. Fry for ~1 1/2 minutes on each side. Only fry up to 3 donuts at a time.
- Once done, transfer the donuts onto a cooking rack heavily lined with paper towels. Fry the remaining donuts and donut holes.
- Once the donuts are cool enough to handle, roll the donuts in sugar, covering completely.
- MAKE THE GLAZE: Whisk all of the ingredients together in a small bowl. Drizzle the glaze over the top of the donuts and donut holes.
- Donuts are best the same day. Otherwise, store donuts, covered, in the refrigerator up to a few days.
Baker’s Notes (*):
During the kneeding process, my dough has required varying amounts of extra flour throughout the various times I have made this recipe. That is why it is important to check the consistency of the dough prior to moving on, and adding the appropriate amount of additional flour to achieve the desired consistency.
By creating the indentations first you are ensuring that the butter within is being flattened and moving along with the dough. If you were to simply begin rolling the dough like normal you would only be rolling and thinning the top dough layer and the butter block would not spread with the dough, thus reducing the amount of overall layers and increasing the likelihood of dough breaking along the way. Unfortunately I speak from experience ;)
When rolling out the dough, you want to find a balance between being gentle, keeping the layers intact, while also working quickly, so that the butter does not start to melt. For best results, roll the dough in a cool environment. When I worked near my window A/C and away from my hot kitchen, my results were better.
Whenever you are rolling the dough, always be monitoring for areas of tearing dough. If your dough starts to break and butter comes out as you are rolling it, patch up the hole with flour and flip the dough.
If you do not have a donut cookie-cutter, you can substitute a 3 ½” round cookie-cutter for the outside, and a 1” cookie-cutter to cut out the donut holes.
I used a candy thermometer to easily and safely measure the temperature of the oil.